5 Simple VFX Techniques Professional Video Editors Use Every Day
What simple VFX do professional video editors use most?
Professional editors rely on five essential VFX: masking for performance fixes, compositing multiple takes, speed adjustments for dialogue, looping for extended shots, and subtle digital camera moves. These simple techniques add high-end polish without flashy effects.
Masking to Combine the Best Performances
When you're editing, you'll often find the best visual performance happens in a different take than the best audio performance. This happens more often than you'd think — especially in commercials where every word matters.
Here's how masking saved a commercial I cut with NFL quarterback Brett Favre and an insurance salesman. The camera was static and the two characters didn't overlap, which made this technique perfect.
I placed the best audio performance on video layer one and the best visual performance on video layer two. In Premiere's Effects Control panel under Opacity, I used the pen tool to draw a simple mask around Brett. This revealed the shot underneath while keeping his audio separate.
The real power comes next. Since Brett's audio was disconnected from the main take, I could adjust the rhythm completely. In the original take, he delivered his line much earlier and would've been out of sync. With the mask in place, I moved his audio so his line came up right before the salesman's line — they're almost on top of each other now.
That simple mask enhanced the performance and completely improved the rhythm of the scene. On your next project, ask yourself how you can use masking to combine the best elements from multiple takes.
Compositing Multiple Elements for Complex Shots
Sometimes what looks like a simple shot is actually built from several different elements. Early in your career, you might think it's all about picking the best take and moving on. But once you know these tricks, you can get the most out of every shot.
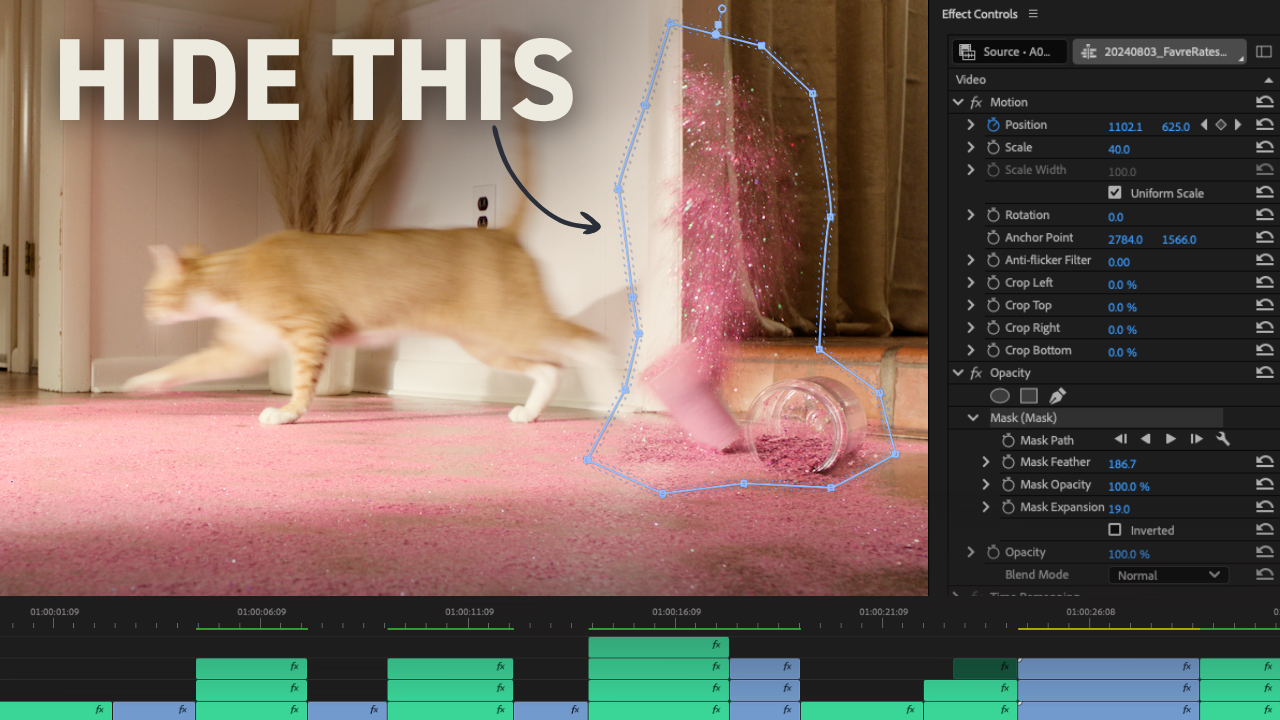
I cut an anti-smoking commercial where a cat knocks over a jar of glitter and walks across the frame. At first glance, it looks simple. But that moment was built from four different elements.
The first layer was a clean plate. On the second layer, I masked out the cat trainer who was letting the cat go before it jumped down. I used keyframes to have the mask move over time, changing the position and letting Premiere do the rest.
Next, I had the cup of glitter. I had to adjust that mask quite a bit as the glitter spilled toward the camera. Finally, I added one more jar of glitter from another plate just to make it seem even messier.
When you put them all together, you get the finished shot that looks completely natural.
Speed Adjustments Beyond Montages and Transitions
You probably already adjust clip speed all the time, but here are two ways to use speed adjustments that might surprise you. Most editors only think to use speed changes for montages or transitions, but you can also use them in dialogue scenes.
For a commercial where an auctioneer was officiating a wedding, the actor did a wonderful job. But the director and I decided it would be even funnier if he was going a little faster. We sped up his visual and audio by 20%.
When you speed up audio, it pitch shifts up like Alvin and the Chipmunks. So we simply added a pitch-shifting effect to bring it back down to normal.
Another trick — you don't have to speed up an entire shot. For the cat jumping across the frame, maybe I liked the pace of the walk but wanted the leap to have more punch. I placed a cut right as the cat jumps and adjusted the speed of just that initial jump by 10%.
It's fairly imperceptible, which is good. Professional video editors know that visual effects should be subtle, but it adds that extra bit of energy.
Want to master the emotion-first approach that drives these choices? The Think Like A Broadcast Editor guide shows you the 5 criteria top editors use to craft emotionally-impactful edits.
Looping for Extended Shots
Every frame counts in editing. Sometimes you just need to hold a moment a little longer, even if it's just by a few frames. AI tools like Generative Fill can create new frames, but they're not always reliable for high-end work.
There's an old-school trick called looping that works perfectly. Let's say you have a shot of a writer at his desk and the camera cuts six frames earlier than you wanted.
Go to the end of the shot, go back a few frames, and make a cut. Then copy and paste that clip to the end and reverse the speed. When you play this, it plays to the end of the shot and then reverses back six frames.
This looks seamless and gives you that extra bit of footage needed to fit the rhythm. This works particularly well when there's minimal movement in the frame.
Adding Subtle Digital Camera Movement
Think about your favorite movies — the camera is rarely perfectly still. There's almost always a little bit of motion. But many effects like masking work best with static cameras. To fix this, you can add your own digital movement.
The key is intention and subtlety. One of the biggest mistakes I see in YouTube editing is adding too much movement or unmotivated movement that distracts from the story.
To add a subtle digital push-in, go to the Effects Control panel and work with scale. Put a keyframe at the beginning of the shot and another at the end, adjusting the scale by just 2 to 4%.
It adds a nice sense of movement without calling attention to itself. You can even layer your digital moves on top of existing camera moves to push the emotion further.
Start subtle. Try it on one of those static shots where you used a mask to draw out more emotion. The goal isn't to show off your technical skills — it's to serve the story.
Ready to take your editing to the next level? Edit Like A Broadcast Pro teaches you to create emotionally-impactful edits that win serious clients with real budgets.
